[Lab Project 20] Explaining Side Special- Fox Illusion
IMPORTANT NOTE: Please be aware that there are hyperlinks to examples and demonstrations for visualisation purposes, so be sure to click on them. This is a big article with a LOT of images in it. Please use the contents below to easily navigate to different parts of the lab project.
contents
- Introduction
- The basics: Frame data of side B
- The hitbox of side B
- What determines which direction the opponent gets launched??
- Sweetspot hitbox visualisation
- Applying Side B in different situations:
- The dead zone of side B
- Fox going through aura sphere using side B
- Fox going past attacks using side B
- Fox trading with attacks using side B
- Fox going through counters
- How to punish Fox's side B properly
- Fox's other side B interactions:
- Fox hitting walls/slants with side B and not grabbing the ledge
- Shortening side B at the ledge
Introduction
Fox’s side B seems like a very simple move at first, but a lot of what it does, how it does it, and why it does it is actually a mystery for a lot of smash players. After some close-up analysis of the move, as well as digging through the game’s data itself, the lab team can now fully explain what’s the deal with this move. In this project, we’ll be deciphering the move, as well as busting many myths and rumors that surround it.
The basics: Frame data of side B
Before getting into the more complex stuff about the move, we would like to clarify the frame data behind it. Fox’s side B has 20 frames of startup, having a active hitbox between frames 21-25 as Fox rapidly moves across the stage. It also deals 3% of damage and has a base knockback (BKB) of 10. However, the First Actionable Frame (FAF) of the move depends on what variation of side B you are using.
Grounded side B
On the ground, Fox has 44 frames of end lag (FAF: 70). It will launch opponents at an 80° angle and has a knockback growth (KBG) of 170.
clip of grounded side b
Aerial side B
In the air, the amount of “end lag/landing lag” you have depends on whether you land or not, and when you land. Let us assume that Fox’s side B was buffered from a jump. It will take Fox 12 frames to land after the active hitboxes (lands on frame 37), and has 15 frames of landing lag, so he has a sum of 27 frames of lag (FAF: 52). If you are using illusion to get back onto the stage, Fox can land earlier than 12 frames, shortening the FAF even more. However, you will always have 15 frames of landing lag when landing with the aerial side B, unless you land after the FAF in the air, which is 70. Side B does not have autocancel windows. It will launch opponents at a 60° angle. Due to the fact that it has a lot less lag than the grounded side B, it can be used as a combo starter. Finally, it has a KBG of 200, making it launch opponents further than the grounded side B as their percent gets higher.
clip of aerial side b
back to contents
The hitbox of side B

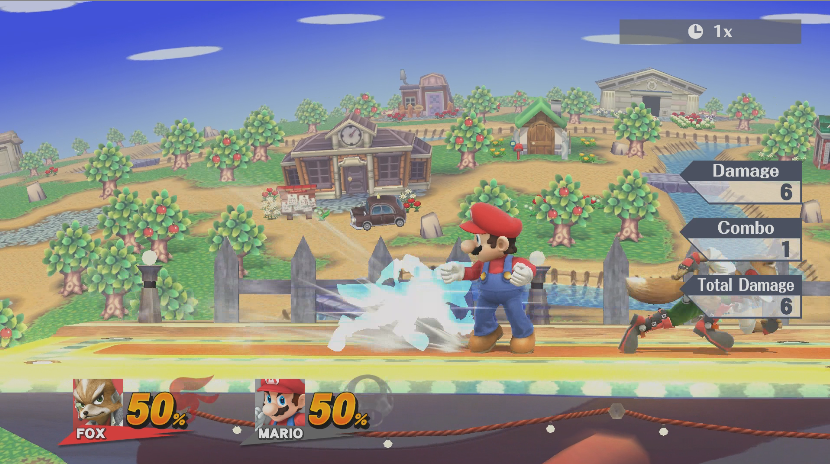
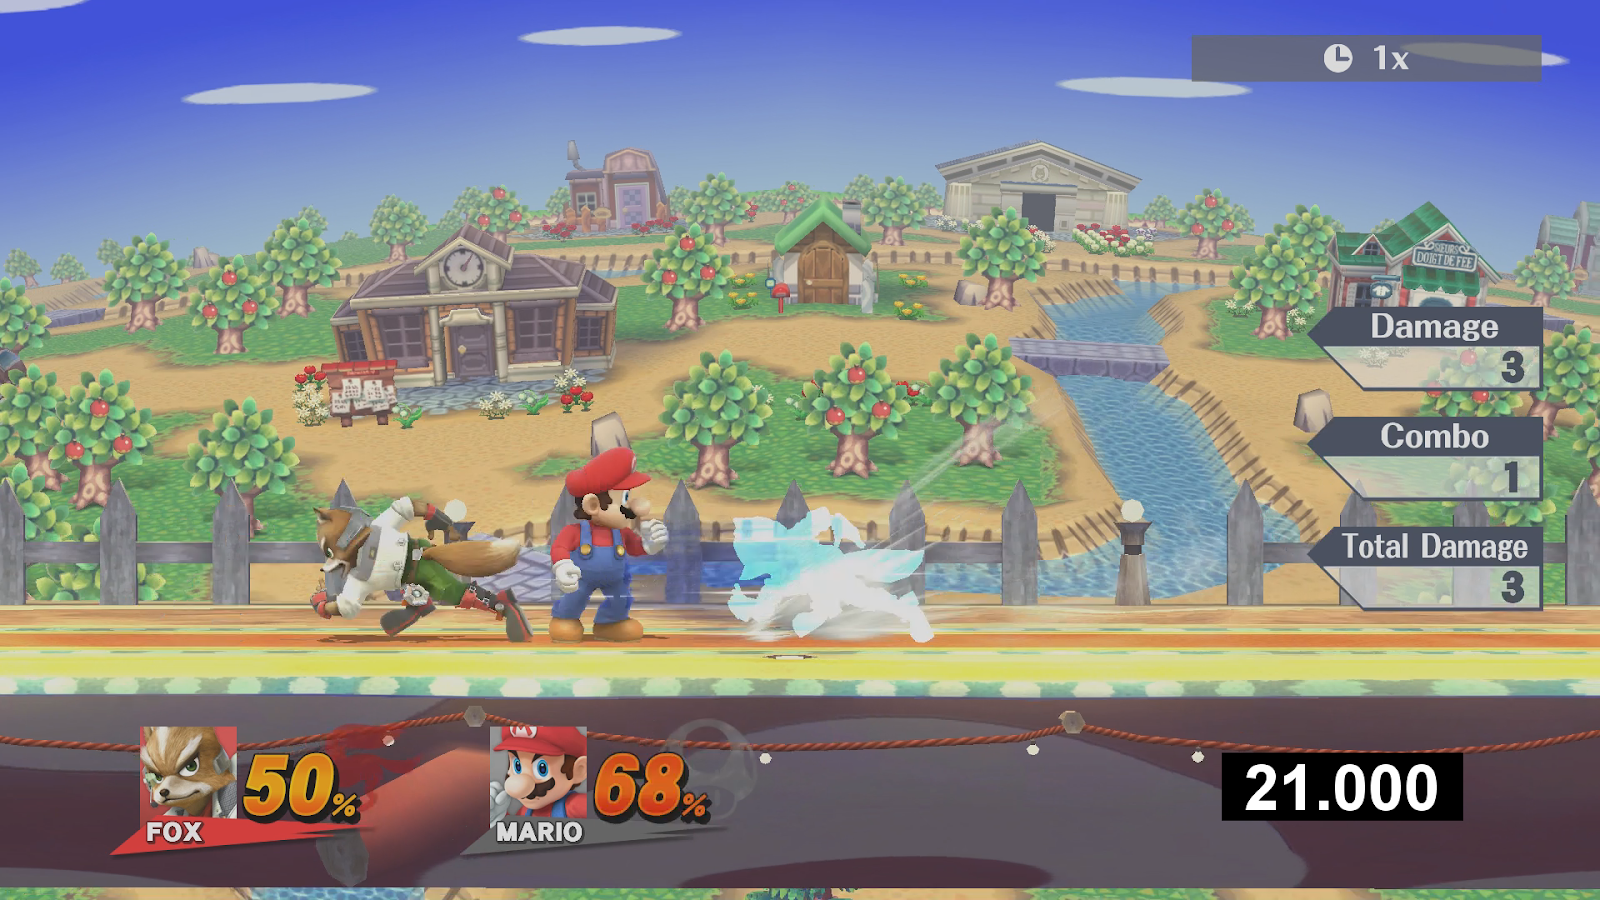
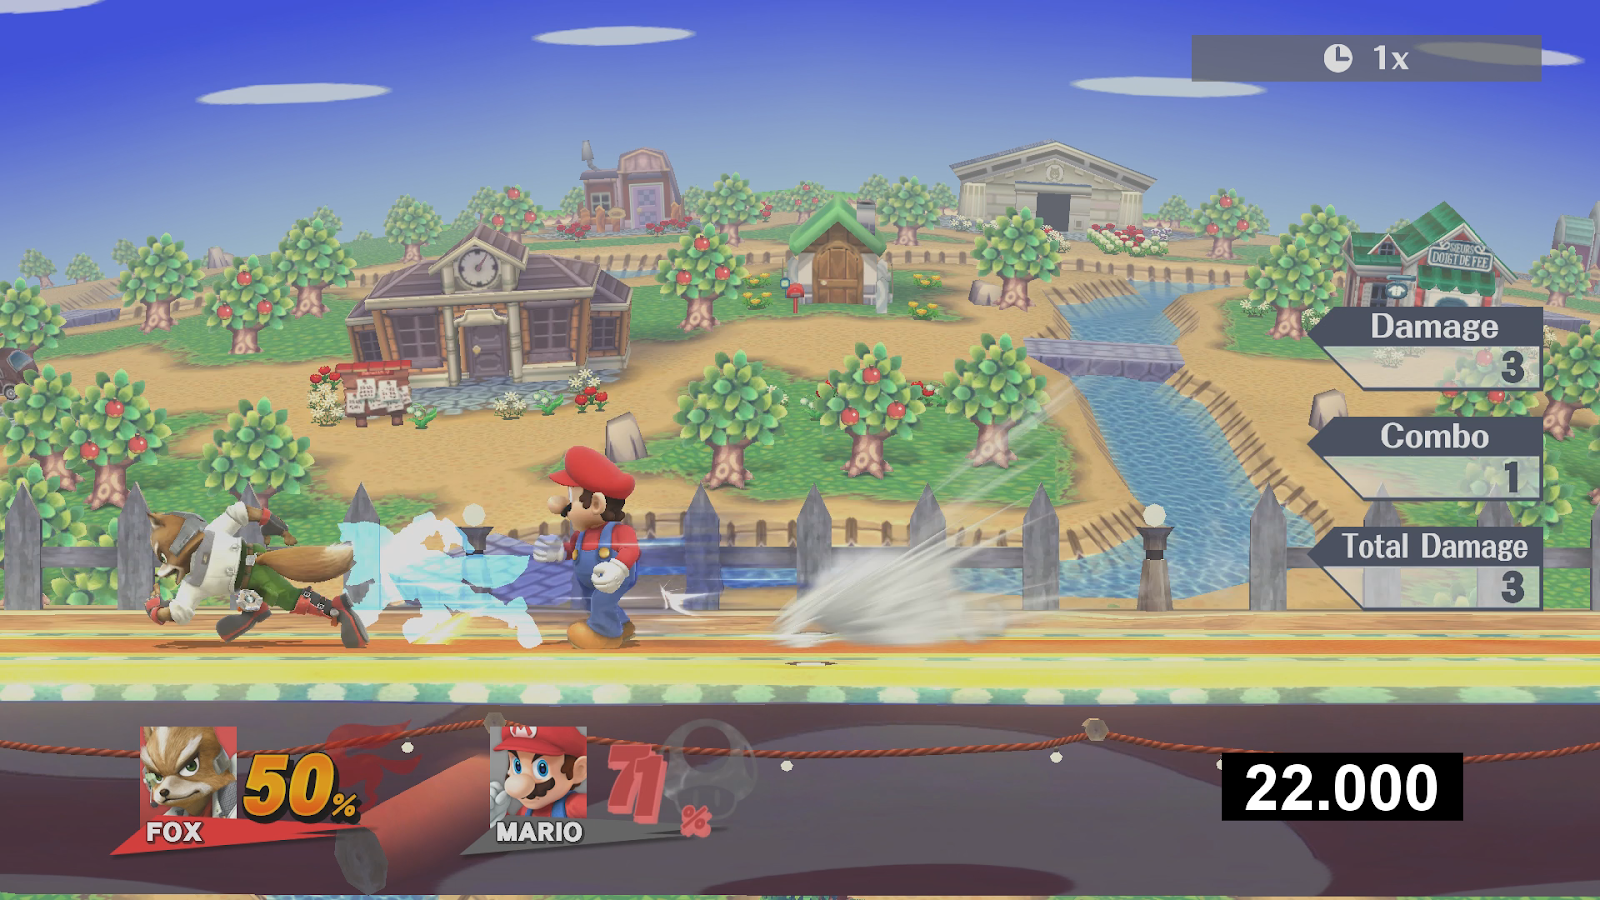
This is where what people say about the move becomes…. Mixed, to say the least. From the hitbox being on Fox to the hitbox being in front of Fox, and so on. We can, with evidence, confirm that the hitbox of side B is NOT on Fox at all. In fact, the hitbox is on the illusion itself. Let’s look at an example of Fox hitting an opponent with side B.
Here you can see the 1st frame of the hitbox as Fox zips towards Mario.
On the 2nd frame of the active hitbox, you can see something rather odd happen. Fox is overlapping Mario’s hurtbox, yet nothing has happened to him. Not even a visual indicator of a phantom hit.
This indicates that Fox does not actually have a hitbox on himself at all during the active hitboxes of side B. Instead....
On the 3rd frame of the active hitbox, you can see that the illusion is overlapping with Mario, and Mario is seen to be hit. This confirms that the hitbox is on the illusion, not on Fox. Now that is out of the way, let us explain how the move actually works, since it is a little more complicated than a hitbox region.
The game constantly positions your character using X and Y coordinates. With these coordinates, the code for side B constantly saves the current coordinates of Fox throughout the move as memory in order to move him. During frame 21 of the side B, the game checks the current coordinates and adds a value to the X coordinate, moving Fox horizontally. For example, if Fox’s coordinates on frame 20 were (0,0), the game will add 10 to the X value on frame 21, so he moves by 10 in the X axis (not literally 10. Again, this is an example). On the 22nd frame, the game not only moves Fox, but uses the coordinates of Fox from the previous frame to create a “weapon” (this being the illusion itself), with the hitbox in the exact coordinates of Fox from the previous frame. This happens from frame 21-25
In short, the illusion will appear in the same position where Fox was on the previous frame from 21-25. Here is what we mean by using an image.
Clarification: The gif you saw of the move being slowed down showed more than one “illusion”. Do not worry about those, as they do not have any hitboxes attached to them, and are for visual effects.
What determins which direction the opponent gets launched???
Most have just passed this by as being a random occurrence. Sometimes you get it, sometimes you don’t. We did manage to find out why the move can send opponents in 2 different directions. The direction in which the opponent will get launched is dependent on where they are hit on the illusion’s hitbox. When the “weapon” is generated, a hitbox is also generated with it. Most hitbox objects are circular (with the exception of extended and Special_Hitboxes, in which they are stretched circles, essentially being ellipses. For example, Fox’s Dtilt contains Special_Hitboxes). These hitboxes have a centre, and depending on which side you hit the opponent with, they will either get launched towards or away from Fox. Here is an image to make things a little easier to understand.

The angle that the opponent is launched is technically the same. The angle they are launched is based on the direction they face. The opponent will face opposite directions when hit by either half of the hitbox. Also, the hitbox isn’t entirely located at the centre of the illusion. It is actually shifted slightly to the Y axis.
Also, please be aware that this hitbox visualisation is not 100% correct. There has not been a real hitbox visualisation of the move yet, but with the footage we have, it is safe to assume that the hitbox is similar to this. Let’s show some examples of the illusion hitbox in action. Here is what we got:
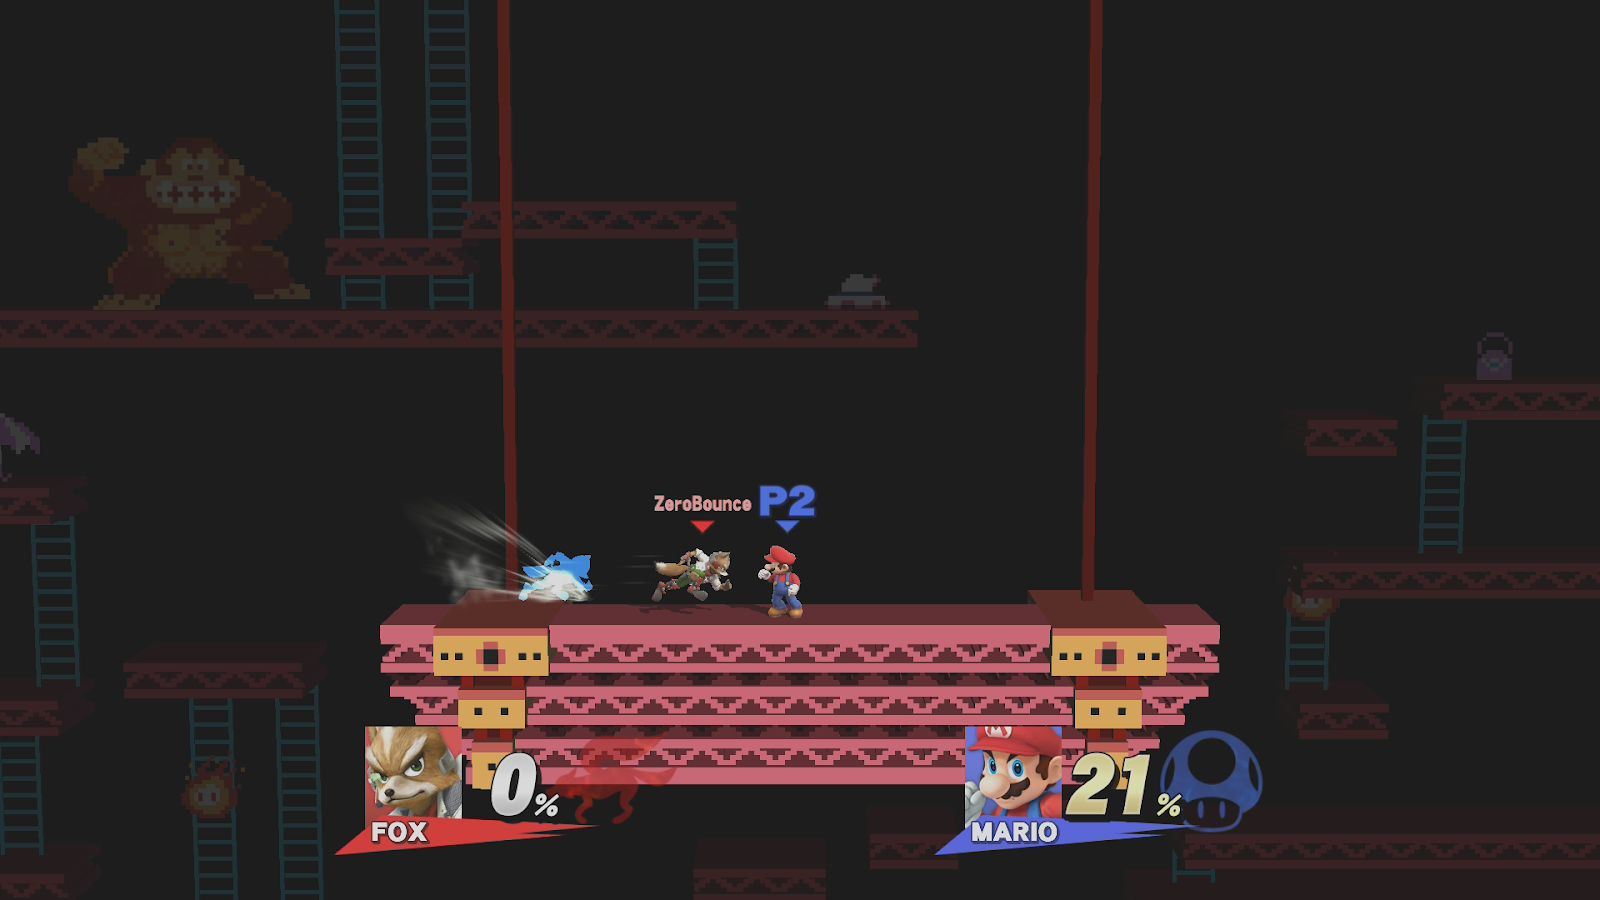
Example
Notice that, on the first frame, that some of the illusion is not hitting the 2 Wii Fit Trainers on the right side?
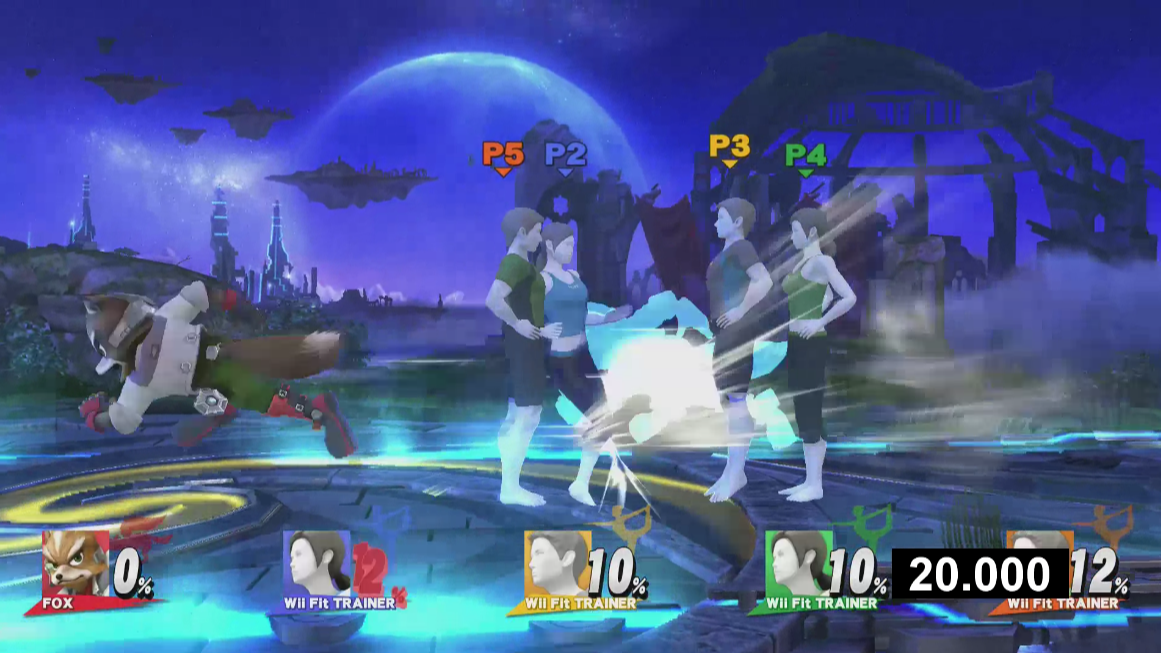
Clip
Notice how the illusion is technically overlapping Mario’s arm, but not the actual hitbox of the illusion?
It doesn’t end there, unfortunately. In Smash 4, hitboxes are interpolated. This basically means that the space between the current hitbox and the hitbox of the previous frame are connected together, which creates a hitbox connecting the two together. It looks somewhat like this:
Because of this, Fox’s illusion hitbox ends of being something like this….
To confirm this, look at the following images:
On the 21st frame, Fox zooms past Mario, but Mario does not get hit because the illusion hitbox is not overlapping with his hurtbox, as it is nowhere near him (something about Fox zooming past characters like this will be explained further on in this lab project post). However, on the 22nd frame, The illusion goes past Mario, but isn’t physically on him. However, because the current and previous frame of the hitbox end up being connected together by a hitbox to connect the two, the hitbox overlaps Mario’s hurtbox, therefore Mario is hit. Furthermore, the 2nd half of the hitbox (in this case, the ride side of Fox) AND the hitbox connecting the 2 frames will always send the opponent away from Fox. Confusing? Yeah, we don’t blame you. It is quite a lot to take in, so please go through our gfycats, as we visually show what we mean.
Note: (just saying, if hitboxes weren’t interpolated, this move would be VERY bad since it would have so many blind spots).
back to contents
Sweetspot hitbox visualisation
Obviously we do not want the part of the hitbox that sends away (in terms of actually using it to combo, not to reset neutral or to recover), so we made an image visually showing where during the animation the “sweetspot” of the move is. Hopefully this helps everyone understand it better. We did create one a very long time ago, but when labbing the move in more detail, it was actually wrong. We apologise for anyone who has been sharing that image. We didn’t really know much about the move ourselves, at the time :/

From creating this image, we can now explain why this move is so inconsistent in terms of where the opponent gets launched. At the beginning of the move (especially between frames 21-22), the hitbox is so spread apart because Fox moves so far, it is more difficult to actually get the sweetspot. However, between frames 23-25, Fox slows down a lot, so the sweetspot hitboxes per frame are a lot closer to each other, making it easier to land the sweetspot, which allows you to followup with moves. You are most likely going to hit with the sweetspot on either the very first frame (21), or nearer to the end of the move. So, now that we have explained how the move works and why it works, we’ll now be applying the information we have in real demonstrations and matches, as well as explaining why certain things with side B work and don’t work.
back to contents
Applying Side B in different situations
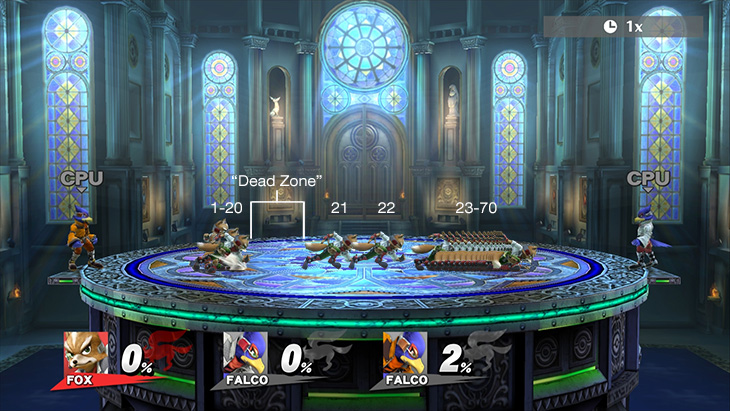
The dead zone of side b
You may have heard of this phrase thrown about when people talk about Fox’s side B. The dead zone is the area in which Fox just seems to “disappear”, and not be hit. There have been various reasons why some people think this, like Fox having intangibility frames. However, these reasons are wrong. The reason why Fox doesn’t get hit is because he isn’t there to be hit in the first place. Between frames 20-21 of his side B, he skips a large amount of distance (compared to the distance of the other frames of side B), which allows him to escape certain attacks very close to him.
Basically, in that dead zone region, there is no hurtbox there, so you’re just hitting thin air instead of Fox. Let’s see from 2 examples where it has caused confusion
Fox going through aura sphere using side B
In this demonstration, you see Fox not only go past Lucario, but hit him with the illusion hitbox. On the 22nd frame of the illusion, Fox (somehow) manages to skip past the aura sphere because of how far he travels in one frame. As the illusion is placed where Fox was on the previous frame, it overlaps with Lucario’s hurtbox, which launches him away from Fox due to Lucario’s hurtbox overlapping with the sourspot. This is actually a strategy that Fox players use in order to get past Lucario’s aura sphere trap at the ledge.Fox going past attacks using side B
Fox going past attacks using side B
In this demonstration, like any normal match, the Marth is trying to edgeguard Fox using Fair, but ends up clanking with something and missing Fox completely. The reason why this happens is because Marth doesn’t hit Fox at all. He is trying to hit Fox where Fox would travel the most distance (between frames 20-21), creating a dead zone. The only thing that Marth hits is the illusion, hence the clank. Frame-by-frame, Fox is not actually affected by hitlag when doing side B, so he will keep going, while Marth is stuck in hitlag as the move clanked with his Fair.
Fox trading with attacks using side B
Unfortunately, when mispaced, you will not be able to get past Lucario’s aura sphere, and will end up getting hit. However, due to the fact that the illusion does not go through hitlag, even when Fox is, it will travel to the position that Fox was at on the previous frame, and then the hitbox is removed as Fox is no longer doing side B. The hitbox is interpolated, so it overlaps with Lucario’s hurtbox (barely) and Lucario is hit. So even when not spaced perfectly, at least Lucario is being lauched away. The aura sphere charge has very little knockback to it, so it will only put Fox in a small amount of hitstun as he flinches.
Fox going through counters
Marth counters Fox’s illusion hitbox on the illusion’s 23rd frame (hence why Marth flashes white). However, Marth is stuck in freeze frames for 16 frames, so he does not actually have an active hitbox out until frame 5 (in this example, his active hitbox comes out on frame 44). During this, Fox is not in hitlag at all, and continues to move while Marth is stuck in freeze frames. This allows Fox to avoid being hit by the counter, and may even be able to punish Marth’s end lag of the counter (was not tested, so do not take our word for it). Using counters to punish Fox’s side B is not recommended, except for Bayonetta’s Witch Time, which will affect Fox as well as the illusion. Fox's illusion is classed as articles, which do not cause attacker hitlag. This can explain why Fox does not go through hitlag when interacting with any hitboxes or hurtboxes.
How to punish Fox's side B properly
Although Fox moves extremely fast over a great amount of distance, punishing it is actually quite simple, and all characters can punish it very hard if the Fox is reckless with the way they use it. A common mistake for plays to do when trying to punish his side B is to try and hit him near the beginning of the move. While this is possible to do, it is quite unreliable, and more times than not, you will wiff your punish, allowing the Fox to reset neutral, get back onto the stage, or even hit you with side B, which can potentially lead to even more damage if they hit you with the sweetspot of the move. What you should be doing is the following 4 things:
Fading back with an aerial as Fox closes in on you
This can be any aerial, but it is better for you to use an aerial that is not very hard to time. For example, you can use a move with a lot of active frames (i.e. Sheik’s Nair or any multihit move). As you fade back frame-by-frame, the distance that Fox covers per frame decreases, increasing your chances of actually landing a hit on Fox. This is the easiest and safest option to go for, and can end up in him being offstage again, or starting your aggression.
Using a projectile
Projectiles are surprisingly very good at catching Fox as he zips towards you. If you are a distance away from where he initially starts his side B, then chances are is that you will hit him as he rapidly approaches you. Again, this is very easy to do, and can even lead to kills when using strong projectiles, such as Samus’ charged shot or Mewtwo’s fully charged shadow ball.
Running to where Fox will be after the move ends and punishing his end lag
This one is especially good for when Fox tries to land onstage with side B, especially near the ledge. For example, from the ledge, Fox will be able to travel to roughly the centre of the stage using side B. Knowing this information, you can bait him to use the option by standing close to the ledge, and then as they are about to let go of the stage to side B, run towards the centre of the stage and punish him as he is about to land, or while he is in landing lag. With good positioning, you can get a charged smash attack to take his stock earlier than normal. His hitbox will end quite a while before he actually reaches the middle of the stage and lands, so you do not need to worry about any trades or clashing. This is ultimately the best option in terms of killing, but may need a bit of practice to do consistently well.
Running back and grabbing Fox with a pivot grab
This is also one that may require a little bit of practice, but can be very effective for those with a good grab game, especially if they have kill throws or tether grabs. Pivot grabs have a bigger grab box than standard grabs, and because you are moving back in the same direction as Fox is travelling, you will have a better chance at grabbing him. You can now either throw him offstage or in the air in order to start your edgeguard game against him, or try to juggle or combo him, depending on the percent.
Fox’s other Side B interactions
Fox hitting walls/slants with side B and not grabbing the ledge
When Fox hits a wall or a slant (you can hold down the analog stick in order to avoid grabbing the ledge), he is stationary until the move ends and he starts to fall. During this, the hitbox is still active, and even though Fox is not going anywhere, the illusion is still there. This is because the same rule still applies when Fox does side B, in which the game will check the position in which Fox was on the previous frame, and place the “weapon” (illusion) there. If Fox is stationary, then the illusion will stay stationary. This can actually be applied in certain situations, such as what Skarfelt showcases in this video
What happened is that Skarfelt held the analog stick down as he side B’d into the stage, which prevented him from grabbing the ledge. This put out a stationary, but active hitbox of side B exactly where he was at the same time. Captain Falcon tried to recover with up B, and gets hit with the sweetspot of the Side B, launching him towards the right (where Fox would have been travelling if nothing was blocking his way). In result of this, Captain Falcon gets stage spiked, leading to a stock being taken. This can prove useful against exploitable recoveries, like Captain Falcon, or against recoveries with no hurtbox, such as Sonic and Pit. As Skarfelt says in his tweet, you can also use this as a way to delay your timing of a ledge trump.
Shortening side B at the ledge
From frame 23 onwards, Fox shifts his hurtbox upwards a little bit, as he leans to the side more. This can result in him sliding up and actually landing on the stage. As I said before, Fox can actually land earlier than 15 frames after the active hitboxes are done, which explains why he is able to act nearly immediately out of landing. To be more precise, he can land as early as 4 frames after the hitbox (frame 29).
This concludes the side B explanation lab project! We feel like this is quite an important project as people now know how this move works, and how to use it properly without hoping for the best. Please spread this to smashers alike. Thank you for reading 
-Fox discord Lab team
back to contents
This blog post was written by a SSB World
community member. Share your Smash 4 knowledge by creating your own blog
post now.
You must log in to comment.
 Fox Lab Team - May 6, 2017