Ken Theorycrafting
This post is mostly notes for myself and ideas I have based on my experiences. I fully accept that lots of my stuff will be wrong at higher and lower levels than my own. I find it useful to write down ideas I get during sets or I come up with when either playing or labbing as I don't get many opportunities to play people IRL so saving my ideas somewhere I can't lose or forget them seems like a good idea.
I am the type of person who needs to understand why something works to be able to practice it without getting frustrated. If that sounds like you then feel free to find any tech you want to learn in this post and use my description to learn it better.
EDITS/UPDATES:
- 5/20/19 added ledge shenanigans to talk about ledge traps and mixups.
- 6/6/19 post 3.1 update regarding % and SDI
- 6/15/19 added input buffering to add weird things I've found to do with inputs
Quick Notation guide:
this guide assumes you know normal smash notation
Both Ken and Ryu have light and heavy versions of tilts and command normals. These are notated with a capital L or H before the move (ex: L.dtilt, or H.utilt).
Exception: command normals and specials, in which their weight is at the end of their command (ex: 632L, or 41236H).
(note: the difference between command specials and command normals is command normals can only be inputted with A while command specials can be inputted with both A and B)
All of Ken and Ryu's specials, including command specials, have 3 different weights. This is notated the same way as other command inputs but these, obviously, have L, M, and H. I also use TSRK or tsrk as short for "True Shoryuken" meaning the command shoryu.
Pressing then releasing from frame 1-3 results in light attacks, frame 4&5 result in medium, and 6+ results in heavy. I will use Numpad notation for command inputs and fair nair bair etc for normal smash inputs like areals and smashes.
Lftilt and H.jab have a new mechanic where if you are close to the opponent a different move would come out (H.jab turns into H.utilt). These are notated with a "cl." in front of the move like cl.ftilt and cl.jab. 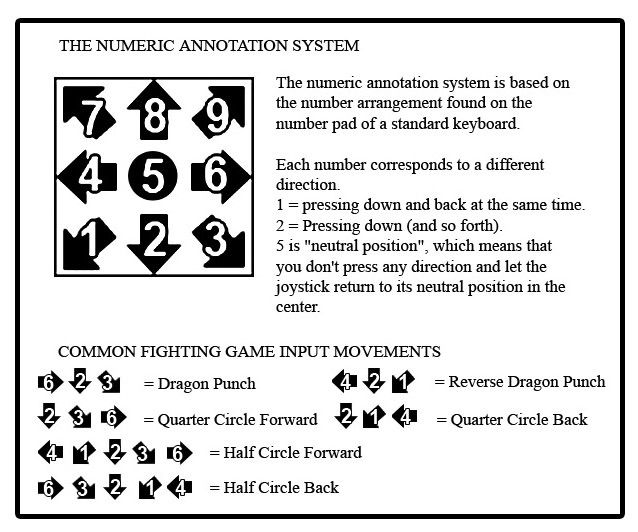
Movement Guide:
Of course, the shotos have a unique ability in 1v1s which allows them to constantly face their opponent just like in street fighter. While this opens the opportunity for many unique strengths like following rolls with dtilt and utilt easily, it is a blessing and a curse. Bair is one of the shotos best areals. plus on block, leads to combos, kills well, has many setups. The issue is it is very hard to use consistently and requires lots of practice to use effectively.
As someone who relied on bair for shield pressure and lots of kills in smash 4, I have searched far and wide for techniques which will let me use it whenever and wherever I want. consistently.
Method 1: Attack Canceling.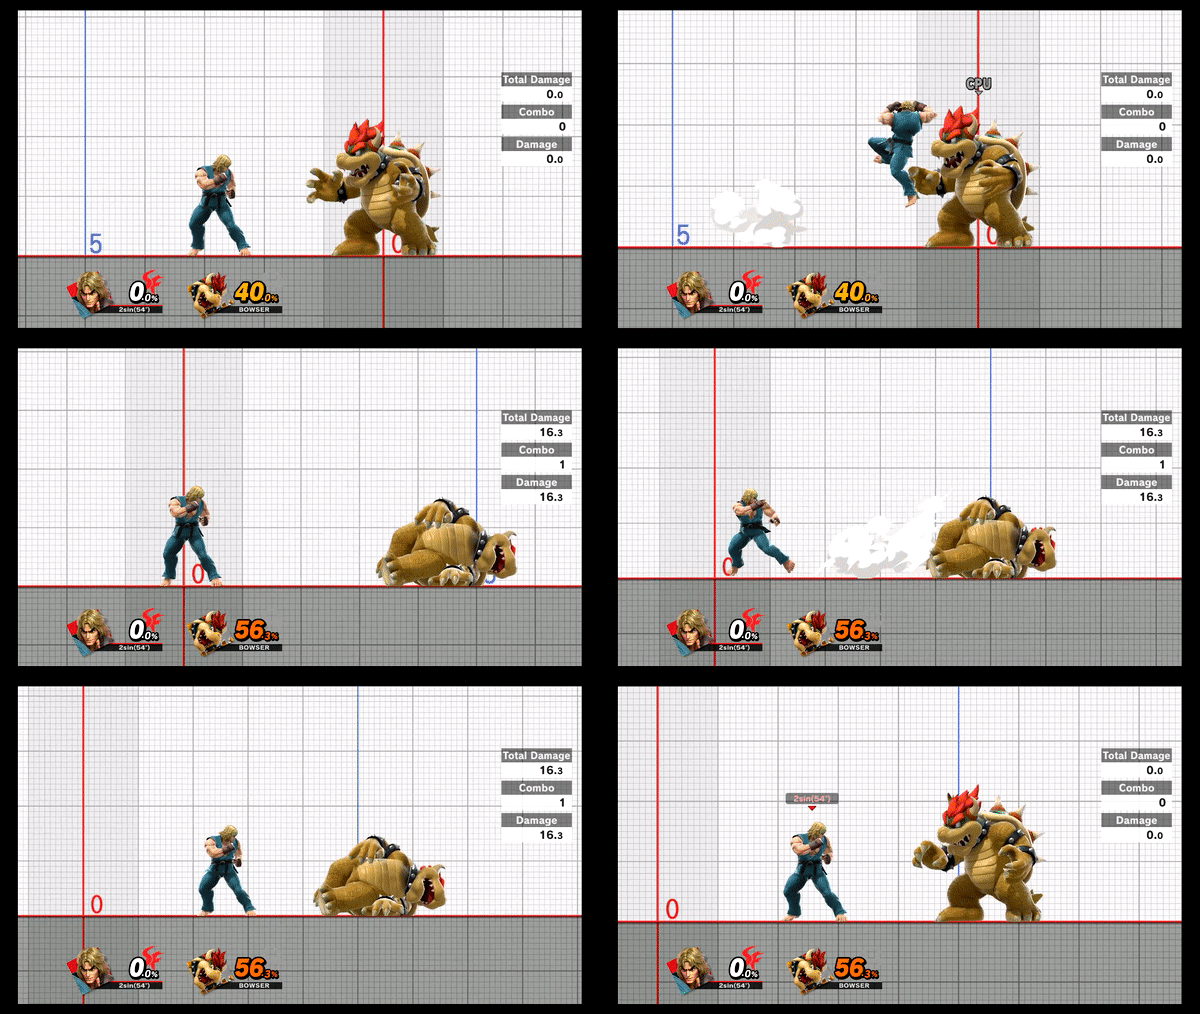
With the introduction of the short hop attack macro came attack canceling. Moves with more than 2-3 frames of startup (rest in peace jump cancel dtilt) are now cancelable with jump for 2 frames, this means you can use a move mid-dash to turn you around and/or cancel momentum before buffering out the short hop areal corresponding to the direction you're pressing.
The way this works exactly is; buffer turn around ftilt, say with c-left, then jump within its jump cancel window it will turn you around like it would if you did the ftilt, then jump, but because the short hop macro checks only the left sticks input it will buffer the areal corresponding to the direction of the left stick. (ex: dash and hold right > c-left quickly after > jump immediately after)
This method is by far my least favorite, but it's quick and moderately easy to do. The main issue with this method is it forces short hop, so you cannot use it to call out jumps very well, and it doesn't let you fake a bair on approach. no way to just threaten with your back to the opponent.
Method 2: Up angled RAR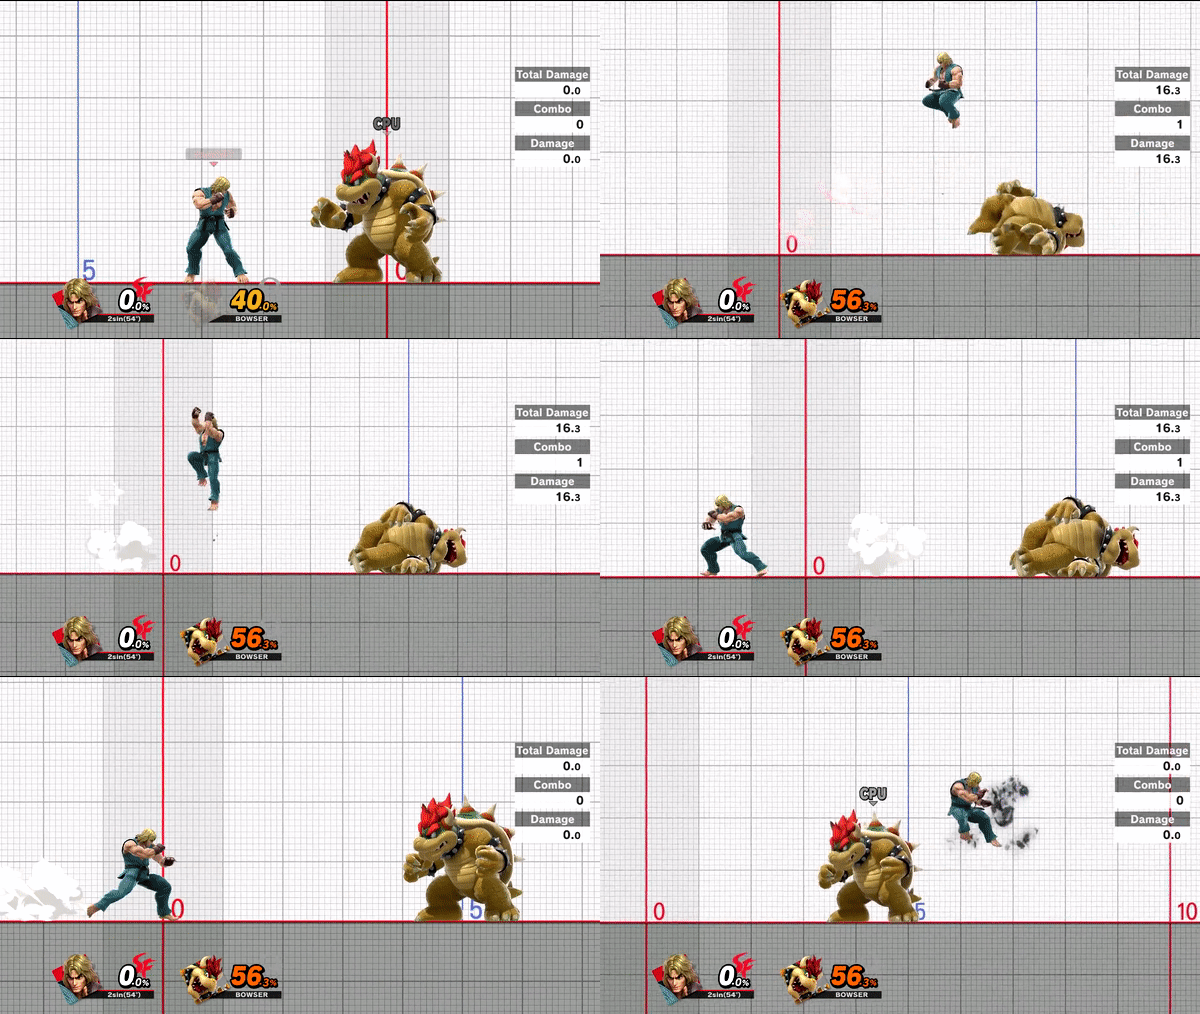
This method lets you keep any previous RAR timings you have ingrained in your right hand, but requires you to re-train your left hand to do a new motion. While it is entirely possible to do a normal instant RAR in this game. There is exactly 1 frame which you can input jump for you to not get a dashback before the jump. This up angled method lets you extend that 1 frame window to as long as you need during initial dash animation. it's really simple, especially on GameCube, but is very awkward to use if you are not used to it.
Instead of pressing all the way back like you would to begin the turn around animation in brawl or smash4, simply only go up to the top left, or top right notch before jumping. It's not far enough to trigger dashback and will turn you around as long as you press jump during the up-left or up-right part of your input. (ex: instead of 6 > 4jump > 6 to rar, do 6 > 7jump > 6 or 6 >987jump > 6)
This method is much more versatile as you can still instant bair if you are quick enough, but you can also do it full hop and double jump easily. As well as you can instant RAR jump at midrange to bair pressure or feint a bair approach instead of requiring a little run-up for consistent rar.
Note about M TSRK:
The killing hitbox on M TSRK is surprisingly big. According to Kuroganehammer there are only two hitboxes on areal M TSRK, the 1st hit being the one you want to avoid for being inconsistent and weaker. the 1st hit only lasts from frame 6-8 and the good 2nd hit lasts from 9-19! 10 whole active frames makes uair M TSRK consistent, with small timing adjustments at later %. Ken's only problem with killing would be setting up the med shoryu and the difficulty of releasing the button within the 2 frame window. EDIT: even after the nerf to M TSRK, it still kills a solid % earlier than the other areal SRK. its usefulness is only less because grounded H TSRK kills at reasonable % now. but in general M TSRK can kill around 10-15% earlier if necessary, which isn't often but I don't feel it's useless yet.
Crescent kick:
Even after the buff on Crescent kick (more difficult to SDI) Crescent kick (632L) barely combos, in both frame advantage and distance. it's so close that a solid amount of SDI away will cause nearly all follow-ups (nair, dair, fsmash) to whiff. The key being SDI away. Though this can be exploited to some extent as 632L's brother 41236L kills horizontally. and has very similar shaped/sized hitboxes. that means near the ledge dtilt, utilt, and cl.ftilt are now a 50/50 at mid %. DI in and you can get hit by 632L > fsmash or dair (which both kill surprisingly early at ledge), DI away and you can be hit by a mixup dtilt > 41236L, killing horribly early because of poor DI.
Because of people's tendencies to hold in when getting hit at ledge, and ken's powerful ledge trapping, mixed with his dtilt Tatsu loops moving the opponent near the ledge consistently and safely(ish), I can see this mixup being a staple of Ken play in the future.
Inputs are Weird:
direction inputs stick around:
In most fighters with a special cancel system (to the best of my knowledge) once you press an attack button, the directional inputs before that press are checked within a time frame for a special input, then are thrown out when the move is started. In ultimate I've found that inputting an attack doesn't throw out the previous direction inputs. this allows for easier links for Ldtilt > Ldtilt > 41236L instead you can begin the roundhouse input then tap A at the lowest point to get the 2nd dtilt, then finish the input for roundhouse so what I do is (c-stick tilt) c-down 4 1 2+A 3 6+A this makes the roundhouse input much faster and easier to link dtilt into it.
Disclaimer: I'm just sorta throwing this together so I apologize for any incompleteness of anything. If it's of any use for anyone, I'm happy to help :)
This blog post was written by a SSB World community member. Share your Smash 4 knowledge by creating your own blog post now.
Share your feedback:
You must log in to comment.


